Showing posts with label spring opening. Show all posts

Friday, September 7, 2012

A "Lifesaver" for Leafy Pools


The PoolSkim uses the power of the water returning to the pool to create a venturi suction that draws surface water, and floating debris to it like a magnet. The debris is caught in an easy to clean clip on bag - leaving your pool sparkling.

The PoolSkim:


  • Skims away floating debris such as leaves, grass, hair, dust and insects
  • Attaches to your existing pool - no extra booster pump etc. required
  • Self Adjusts to water level
  •  Works in conjunction with suction cleaners
  • Robust design
  • Easy to clean - uses a tough re-useable clip on bag
  • Reduces your pump's workload                                      
  •  Puts a sparkle on your pool   
  • Ideal for any pool - above ground or in ground


Wednesday, April 25, 2012

Are YOU (And Your Pool) Ready for Summer?

Are you ready?
If the pool was winterized properly and you open early, proper cover removal will ensure that your pool opens relatively clear.


Basic Steps to Opening and Preparing Your Pool for Summer:

Plan to attend Pool School at POOLCO!

Remove water & debris from the top of the cover (and pool deck if you have one). DO NOT LET ANYTHING FROM THE TOP OF THE COVER GET INTO THE POOL!

Remove cover. You should be able to "float" the cover over the surface of the pool, if you have correctly followed our advice.

Clean the cover with BioGuard StowAway (or it WILL SMELL really, really bad next fall when you need to winterize your pool!) Do yourself a favor and dispose of any cover that has developed pinholes from the cover fabric pulling apart (or you will be pumping pool water from under the cover next spring when you open the pool....)

Tighten connections.
Attach Filter and Pump. Did you need to change your filter sand this year? Did you need to chemically clean the sand with BioGuard Filter Cleaner?

Tighten all hose connections -  SUPER TIGHT! 
The manufacture of flexible filter system connection hose recommends changing these annually. Biofilms develop inside the hoses that will require additional chemical treatment. In addition to this, the sun is very harsh and drying on the plastic. The bend in the hose can crack and then leak (and unwanted "fountain"...)

Screw in all pump and filter plugs.


Remove skimmer plate.
Remove plugs and skimmer covers from the pool.

How high is the water level? If there is enough water added to the pool - AND THE WATER IS CLEAR WITH NO FINE DEBRIS ON THE FLOOR** - then beginning running the filter system. Run the filter 24 hours a day for several days until the water clarity and chemical balance are perfect! Then you may reduce filter time to 8 - 12 hours per day (with the use of a timer - or you WILL forget to run filter!)

** If there is a layer of fine dirt (or worse) on the bottom of the pool you must remove this from the pool. Come see us with a water sample for how to best handle this situation.
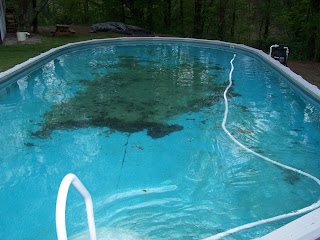
Vacuum on waster or drain...
Immediately test and chemically treat the pool water.  Winterizing chemicals are often depleted by spring, especially if winter and spring temperatures were above average.

Algae starts small...
JUST BECAUSE THE POOL IS COVERED -  BACTERIA, WATER MOLDS, AND ALGAE CAN STILL REPRODUCE!

Bring a sample of water (16 ounce) to POOLCO for a complete water analysis. We will make opening dosage recommendations and customize your instructions based on your pool's needs, your budget and your time!
 Our friendly advice is always free!

Monday, April 25, 2011

Why! Why! Why! No Chlorine Reading on my Test Strips!

Here's the situation:

"Why when lots of shock was added to the pool and I know it's there, I get no reading on 3 different test kits.  I tested immediately after adding the shock, I got a reading of 10 (extreme high). In 5 hours no reading at all (extreme low). I used shock from two different sources. Also, I never had this problem in 30 years." 

It's not the product.

It's not the test kits. 

You simply have not added enough chlorine!
You must add enough chlorine to react with all of the organic matter, algae (live and dead) and wastes in the pool, pipes and filters. 


Green pool. Cloudy pool.
Obviously, if the pool is cloudy or green with algae, you will need to add large doses of chlorine shock. It's easier to understand why you can't establish a chlorine reading if a pool is in that type of condition and obviously needs extreme chemical treatment.


Clear pool.
However, you can have a clear pool and not be able to establish a free chlorine reading.  The pool appears clear. Yet no reading on your testing equipment. That's because what you can't see is microscopic in size (bacteria and particles). By the way, if I looked at your "clear" pool, I would probably not consider it clear, but dull looking. An officially clear pool is CRYSTAL clear and sparkling!


So then, how do you know how much is enough?

ANSWER: Until you get a free chlorine level to last through an overnight period, you will probably not have added enough. 

For the best results bring a sample of your pool water to PoolCo for a complete computerized water analysis. We will customize a plan and diagnose proper dosages for helping overcome this chlorine demand situation. Best of all, the test is free!

As for why this has never happened to you before: 
There could be many explanations for why you never had the problem before. Closing too early in the fall or opening too late in the spring. Winterizing chemicals only last for a very short time once the water under the cover begins to heat up. Older pool cover with pin holes?

SAFETY NOTE: NEVER Add shock through the skimmer! Always add pool shock to water, either directly to the pool or add to a large bucket filled with water.
Pool equipment and chemical manufacturers advise not to do this, as it may damage equipment or cause a dangerous chemical reaction.

Wednesday, March 23, 2011

STEP 5: How to Open Your Pool - How to Attach and Vacuum Your Pool

There are several ways to attach your vacuum to your swimming pool. This method is the best for those new to swimming pool maintenance. Because the pump is turned off while you are attaching the vacuum, you are best able to keep the pump primed and not lose suction.

 
Vacuuming should be done once a week. The more a pool is used the less vacuuming you will do. (The dirt is dissolved into the water and able to reach the skimmer and main drain to be filtered, instead of sitting on the pool floor. Don't be fooled into believing that you don't have to vacuum if you have a main drain. More on why main drains are useless in a later post.)
 
A lot of pool owners prefer using an automatic pool cleaner, the Baracuda, Ranger or Wahoo to clean their pools. We will feature the Wahoo automatic pool cleaner in an upcoming post.

Troubleshooting


Tighten the skimmer connection?
No suction. The filter system has lost its prime (not sucking water). Could be many things. Air leak or a restriction in the system. Tighten all possible ways air can seep into system. Remove all restrictions: empty baskets, clear pump impeller, backwash. See PoolCo for a complete list of solutions.

Dirty water returning back to the pool. How dirty is the pool? You might be better off vacuuming on the waste or drain filter setting. See PoolCo for complete directions on how to do this.


Tighten lid on pump?
Replace pump lid oring or lubricate?
Replace pump plug oring?
Don't backwash too much! Only backwash when the circulation has slowed and the pressure gauge reads 10 lbs over normal pressure. If you backwash too often (thinking that it will help the filter to work better) you are actually slowing the sand's ability to clear the water. Small particles trapped in the sand are sticky. As they collect in the filter, they will help attact more and more particles. 

Monday, March 21, 2011

DUCKS!


STEP 3: How to Open Your Pool - How to Attach Your Pump and Filter System to Your Above Ground Pool

 Attaching your pump and filter system to pool is simple if you follow these step by step instructions:

  • Pool hoses (2) 3' to 6' in length*
  • Pump to filter hose (1) - this is made from a different material than the Pool hoses
  • Metal clamps
  • Screwdriver
  • Teflon plumbers tape

Set the pool pump and filter system by your pump's power source and close enough to the pool skimmer for your hoses* to reach and connect them together.

This should be on a flat dry surface, preferably on paving stones or patio blocks.


Attach the first hose to the bottom of the pool skimmer outlet by sliding it over the outlet spout and securing it with a metal clamp holding it in place.

Now, attach the other end of this hose to the inlet on the pool pump with another metal clamp in the same manner. Pull on both connections with your hands to make sure they are tight.


Attach the next hose to the pump outlet and to the filter inlet as per manufacturer's instructions.

This hose is usually shorter and fatter than the other two hoses connected to the pools skimmer and inlet and will install according to manufacturer's directions. Make sure these connections are tight.

Flexible PVC (pictured here) is an excellent choice for this connection. Visit Poolco for the easiest way to attach this type of hose to your filter system. (We keep plenty of Flex PVC in stock.)


Attach the second pool hose to the filter outlet by again sliding the end of the hose over the spout and securing it with another metal clamp.

Slide the other end of this hose over the pool inlet spout on the side of your pool and secure it with the metal clamps.


Fill the pool about one inch from the top of the skimmer opening (inside the pool).

Turn on the pump with the filter in the recirculate or whirlpool setting. (Don't set on "filter" setting until after you have backwashed sand first.)


Now you can begin to inspect for leaks and tighten connections as needed. This topic is covered in our next blog entry.

Sunday, March 20, 2011

STEP 2: How to Open Your Pool - Before You Remove the Winter Cover

The winter pool cover should be free of all water and debris.
You just don't want to risk ANYTHING from on top of the cover getting into the pool. That "stuff" on top of the cover is the nutrient rich food for algae and bacteria. Take the extra time to siphon off as much of the water off the top of the cover as you possibly can. What looks like just "a few gallons of water", will turn out to be 100 lbs or more of water. Just too heavy for one or two people to heave over the side of the pool.

Here's PoolCo's recommendation:

The night before  Start siphoning the top of the winter cover the night before what is predicted to be a sunny and slightly windy day. (*See Below)

Early the next morning  Early the next morning, attach the leaf net skimmer to vacuum pole. Extend the pole and use the leaf net to spread any remaining water ( that can't be siphoned ) across the surface of the pool. Now would be a good time to begin setting up your pump and filter system. Or you can busy yourself with other outdoor projects for several hours.

Later that afternoon  Most of the time when you return later in the afternoon and the cover will be completely dry. Now you can loosen the plastic coated wire to free the cover. If you have a few (3-5) large plastic clamps, attach these to one end of the pool. Now when you start dragging the cover off from the other side, you should be able to keep anything from going into the water.

Clean your winter cover
with BioGuard Stow-Away


* Do not mistakenly pump water from the pool.   
Older and lighter weight winter covers can allow a minimal exchange of water between the pool cover surface and the pool itself.  Also, a minor hole in the cover can allow a much greater exchange of water.  When pumping water from the cover, we strongly recommend that the water level on top of the cover be monitored closely to avoid pumping a large amount of water from underneath the cover.  Resecuring the cover to make it more taut  when the water on top of the cover is reduced can help eliminate erroneous removal of  pool water. Try placing a "frisbee" - top side down - under your siphon or pump. This should direct water from on top of the pool cover to the frisbee.

Cover Saver siphon available at PoolCo
Save $5.00 Off, while supplies last

 Algae Free Guarantee Sale

SAVE NOW! All the perfect pool products you need to get started this spring are at Poolco